for planning ALL panoramas
PanoCalc
for iPhone & iPod touch
PanoCalc is both a field of view calculator for digital cameras and a panorama calculator.
If you are choosing lenses or choosing between cameras of different sensor sizes PanoCalc quickly tells you the field of view your pictures will have. And if you are planning to join a few of those pictures into a simple panorama, or to make spherical panoramas for VR or even to create gigapans with dozens of pictures then PanoCalc will do all the calculations you need.
Features:
- Presets for popular sensors,
- 3:2 and 4:3 aspect ratios,
- Numerical sensor inputting and 'my sensor' recall,
- Normal or fisheye lenses,
- Portrait or landscape picures for panoramas,
- Pictures per row and overlaps,
- Up to 10 panorama rows and overlaps,
- Optional calculations for zeniths and nadirs.
PanoCalc app is available for iPhone and iPod Touch either as a standalone app or as an integrated part of the Panotool app.
 PanoTool |
PanoCalc |
Obtaining A Field of View

|
To obtain a camera's field of view you need to supply 2 things; the focal length of the lens and the dimensions of the digital sensor. Many values can be dialed in with the picker wheels but you can always enter them with the keyboard. If you are using a compact camera you should use figure the manufacturer gives as the '35mm lens equivalent' for the lens togewith one of the 2 options for 35mm equivalent. These options are for pictures with 3:2 aspect pictures or with 4:3 aspect ratio. Pressing save sensor button saves the current sensor dimensions which can then be recalled by choosing my sensor from the picker wheel. Whilst PanoCalc only displays simple, rounded-off numbers you can in fact enter your data to several decimal places and it will be calculated accordingly. |
Note that calculations for fisheye lenses are theoretical and that PanoCalc makes an assumption that their fields of view never exceed 180°. When thinking of a particular lens please check the manufacturers information.
Pano Calculations - The User Interface
The Panorama Calculations area groups its output into 3 separate sections.
Section 1 - Pictures per row.
This section shows the options for choosing the numbers of pictures in a horizontal circular row.
• Tapping the + - buttons changes the number of pictures.
Section 2 - Rows.
This section shows the options for making multirow panoramas.
Depending on your lens you can choose up to 10 rows and set the operlaps between them.
• Tapping the center changes the number of rows.
• Tapping the + - buttons changes the amount of overlap between rows.
Section 3 - Zeniths and Nadirs.
This section is only for 360x180 panoramas and provides options for those pesky polar areas.
• Tapping the center cycles between (a) 1 perpendicular shot (b) 2 perpendicular shots at right angles to each other and
(c) the 'vertical circle' - which is useful when your panorama can be made from rows alone without perpendicular shots.
• Tapping + - for vertical shots changes the overlap with the rows they are fitting.
• Tapping + - for the vertical circle changes the number of pictures.
The P for Portrait icon button.
• This button toggles between Portrait and Landscape orientation for the pictures making up the panorama. Toggling this button also resets all the panorama defaults including vertical overlaps of 25%.
The SET button. (Not shown and available only in the PanoTool edition)
• This button copies the current pitch settings for up to 4 rows in Section 2 to the Pitch Guide window.
A Case Study
|
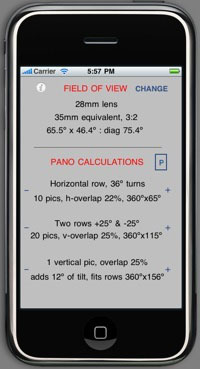
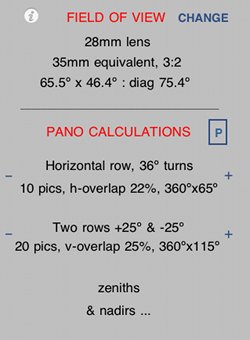
To see how PanoCalc works lets use as a case study the 28mm equivalent lenses found on a number of compact cameras. Here are the default settings for a 28mm lens. Note that whatever the makers claim this is not really a "wide angle" lens. 28mm is fine for multirow panoramas but the large number of pictures makes it a fairly challenging lens to start making spherical panoramas with. However this limitation also make it rather useful for explaining the workings of PanoCalc ! |
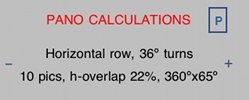
Section 1 - The Horizontal Row
|
The first question to be settled is the best number of pictures to take in a horizontal row. The height of the resultant image will in theory be 360°x65° - circular with the height determined by the long side of the Field Of View which is 65.47°. By default PanoCalc gives us:
This overlap could be enough and so this default might seem like a good option for somebody using a panorama head. Somebody doing a handheld panorama might want more room for error and also an easier angle to judge by eye. Tapping the + - buttons shows us all possible options. All we have to do is choose the best compromise between our desire for (a) minimum pictures, (b) maximum overlaps and (c) manageable turns between pictures. |
Section 2 - Multiple Rows
The Section 2 of the Pano Calculations allows us to look at combining several rows.
|
By default PanoCalc offers 2 rows with a vertical overlap between them of 25%.
In this case the default is:
The image height is 115°. The pitch angles for the rows are plus and minus 25°. Tapping the center gives us similar information about 3 rows and next 4 rows. Further tapping returns to 2 rows and the sequence is repeated. Tapping the + button increases the overlaps between rows - 3 things happen
|
And when the - button is tapped the opposite happens.
So what do we do if we want to make a spherical panorama with this lens ? Should we stretch the 3 row version ? And could vertical shots fill the gap ? Or should we use the 4 row version and if so should we change the default overlap ?
Those are questions Section 3 will answer.
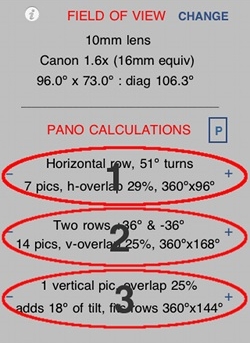
NB. PanoCalc can display calculations for up to 10 rows, but only when appropriate. I.e. with a wide 10mm lens you couldn't use more than 2 rows, so you won't see them !
Section 3 A - The Poles (Zeniths and Nadirs) - Caps
|
Thoughts about rows and shooting panoramas in rows makes a lot of sense near the horizon. But this kind of thinking collapses when approaching the poles - thus this Section 3. If you tap the middle of Section 3 the data cycles through 3 options. The first 2 options are about straight up and down (perpendicular) shots, and these are explained here. The 3rd option 'vertical circles' is dealt with after this. |
The default (Section 2) 3 row option for our lens is 164° high and leaves holes at the top and bottom.
Each of these holes is (180 -164)/2 = 8° in size if we continue to think in rows. But we are not. We are going to think of covering up a hole with perpendicular shots instead - like a kind of cap.
Of course where our cap meets the 3 rows we'll need an overlap so that we can stitch the cap to the row it rests on.
Right now we seem to need a cap big enough to join up with the 360°x164° our 3 rows gives us plus a suitable overlap.
|
The default for the first option in Section 3 is as follows:
Cap, 90° or 2 pics 74°+, overlap 25% adds 10° of tilt, fits rows 360°x160° Cap, 90° or 2 pics 74°+ means that this cap can in theory be made with one perpendicular shot. But if you can't do vertical shots because your positioning string doesn't allow it and/or your feet get in the way then you can do it with 2 opposing pictures - ie 180° apart. They can be at any angle greater than 74°+, hence the plus sign. The default 'Cap 90° or 2 picts' fits rows 360°x156° whilst giving a 25% overlap. As the default 3 rows is 360°x164° all seems fine and this is a possible solution. But we can improve as the cap is bigger than it needs to be. And we could reduce the row area and allow the rows more overlap. By increasing the overlaps in both parts we see that the cap still fits if the overlaps are optimised. As seen left the cap fits 180°x160° perfectly. And overlaps have been improved from 25% to 28%. We now have one solution - 3 rows at +47°, 0° and +47° and either 1 or 2 shots each at Zenith and Nadir. A total between 38 and 40 pictures. But were we just lucky ? What if this cap (or the larger 4 pic cap) had not not been big enough to fill the hole ? Read on .... |
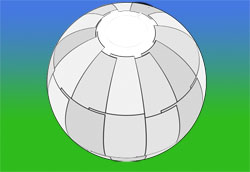
Section 3 B - The Poles (Zeniths and Nadirs) - The Vertical Circle
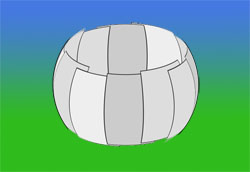
 4 horizontal rows, 8 pictures, optimised overlaps 4 horizontal rows, 8 pictures, optimised overlaps
|
The 4 row option for the 28mm lens in Section 2 leaves no holes at the top and bottom.
Perhaps 360°x213° seems generous at the poles. But how generous, and isn't being generous here actually being wasteful ?
The third option default in Section 3 is :
Tapping the + & - buttons changes the number of pictures - just like it did in Section 1. But the default 8 pictures (by chance) is what we want because 4 rows is the same thing as 8 pictures in the circle see the figure. All the overlaps here are the same. So all we have to do is to copy this ideal overlap of 31% back into Section 2. The pitch angles open up - there are now 45° between them and the poles are now correctly covered. We now have a second solution for our spherical panorama. We could have either:-
Not a difficult decision perhaps. But this has only been a demonstration and a case study. With many other lenses the 'vertical circle' can well give the ideal solution. |
Postscript - higher rows, fewer pictures ?
The explanation of PanoCalc ends here. Thank you for your time.
But I think you are frustrated. You didn't want so many pictures.
Everybody knows that as the rows move from the equator to the poles the circles they lie on get shorter. Why not have 12 pictures at the equator but less with our high rows ?
So lets look more closely at that 68° row. The middles of the pictures are 68° high. Each picture has a vertical field of view of 65° so the top edges go over the pole to 100.5° yet the bottom edges are only 35.5° off the ground.
At 68° the 'circle' the center of the picture lies on is 37% of the length of the equator. At the pole this has shrunk to an infinitesimal point.
But the circle the bottoms of the pictures are on is only 81.4% smaller. (And with the 3 row version where the bottom eges is 14.5° high the circle is 96.8%.)
The effect of keystoning seems devastating when we look at all the tops of our 12 pictures heaping over the poles with 100% overlaps. But our concern must be to have sufficient overlaps at the bottom edges which are inclined to spread out like cogs on a wheel - all gappy in between.
Conclusions: Keep your eyes and feet firmly on the horizon and get your hands on a wider lens !